Monday 25 March 2013

AX 2009 : Exporting data in (.CSV)

Exporting data in (.CSV) in MS Dynamics Ax 2009


static void ExportDataToCSV(Args _args)
{
    Query                             q;
    QueryBuildDataSource    qbds;
    QueryBuildRange            qbr;
    QueryRun                       qr;
    CommaIO                       commaIO;
    FileName                        fileName;
    Pwc_PaymSchedule                     _paymSchedule;
    SalesId             _bkId;
    Description         _dscrp;
    PaymMode            _mop;
    str                 _payRef;
    DocumentDate        _insDt;
    CurrencyCode        _insCur;
    Amount              _insAmt;
    PwC_Sugar_Bank      _bnkDet;
    PwC_PaymentScheduleStatus   _paymStat;
    SysDate             _doa;
    PwC_ClearanceStatus     _clrStat;
    TransDate               _clrDt;
    Amount                  _clrAmt;
    PwC_SugarRecordId       _sugId;
    ;

    fileName       = WINAPI::getTempPath() + "PaymDetails123" + ".csv";
    commaIO      = new CommaIO(fileName,'W');

    q                  = new Query();
    qbds             = q.addDataSource(tablenum(Pwc_PaymSchedule));
    //qbr               = qbds.addRange(fieldnum(Pwc_PaymSchedule,ItemId));

    qr                = new QueryRun(q);

    commaIO.write("Sales order","Description","Method of payment","Payment ref","Instrument date","Instrument currency","Instrument amount","CRM Bank Details","Status","Date of action","Clearance Status","Clearance Date","Amount Paid","Sugar ID");

    while( qr.next() )
    {
        _paymSchedule = qr.get(tablenum(Pwc_PaymSchedule));
        _bkId = _paymSchedule.SalesId;
        _dscrp = _paymSchedule.Description;
        _mop = _paymSchedule.PaymMode;
        _payRef = _paymSchedule.PaymReference;
        _insDt = _paymSchedule.InstrumentDate;
        _insCur = _paymSchedule.InstrumentCurrencyCode;
        _insAmt = _paymSchedule.InstrumentAmount;
        _bnkDet = _paymSchedule.BankDetails;
        _paymStat = _paymSchedule.PaymentScheduleStatus;
        _doa = _paymSchedule.DateOfAction;
        _clrStat = _paymSchedule.ClearanceStatus;
        _clrDt = _paymSchedule.ClearanceDate;
        _clrAmt = _paymSchedule.ClearedAmount;
        _sugId = _paymSchedule.SugarRecordId;

        commaIO.write(_bkId,_dscrp,_mop,_payRef,_insDt,_insCur,_insAmt,_bnkDet,_paymStat,_doa,_clrStat,_clrDt,_clrAmt,_sugId);

    }

    WINAPI::shellExecute(fileName);
}

Thursday 14 March 2013

AX 2012 : Consuming External Webservices in AX 2012

Consuming External Webservices in AX 2012

For those of you who have read my post on the Windows Azure App, may recall my shortcut for fixing the missing bindings and other app.config settings. I've been meaning to dig into this further and come to a solution, but for the Azure post being constrained by my promised "10-minute app" I stuck with the ugly solution. Recently I was talking with the MSDN team about AIF related articles they are wanting to do, and I brought up this issue. They pointed out they had not seen this issue and asked if I had followed thewhitepaper on consuming webservices. Now, there's not necessarily a lot to it, but in looking over the whitepaper I found one tiny little thing, which makes a world of difference and solves my issue: AIFUtil class! This sparked the idea of doing a follow-up on this, and due to a late night conversation on Twitterrelated to this I figured I really need to get this on my blog. The issue as I'm about to explain is a .NET fact and not an AX 2012 issue per se. In fact, as you'll see, AX 2012 has a way to fix the issue.

For this code walkthrough, I will use a free online web service for a currency converter. You can find the WSDL at http://www.restfulwebservices.net/wcf/CurrencyService.svc?wsdl. In case you this link is down by the time you read this, or if you just want to try something else, check XMethods for other free available web services online.

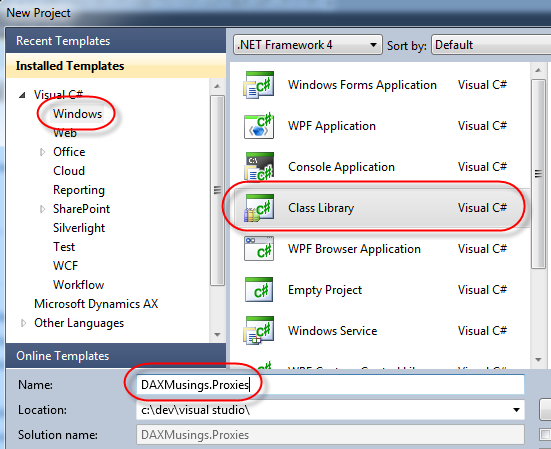
To get started, we'll create a new Visual Studio 2010 Class Library project, which I will name DAXMusings.Proxies


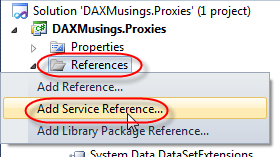
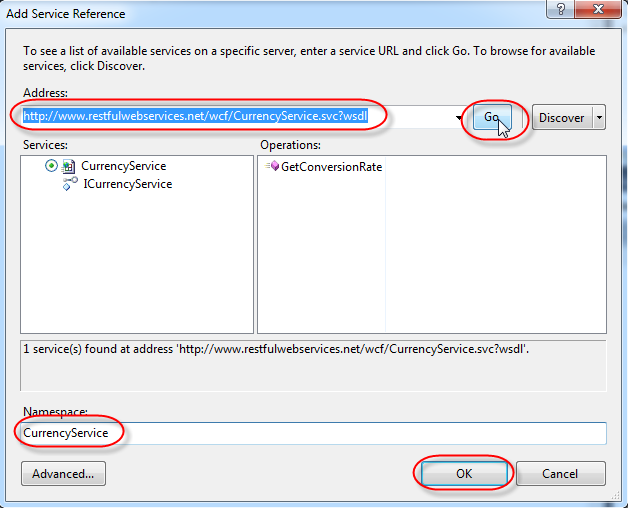
Next, we add a service reference. Right-click on the References node in your solution and select "Add Service Reference". In the address field, type our service URLhttp://www.restfulwebservices.net/wcf/CurrencyService.svc?wsdl and click "Go". In the Namespace field, type "CurrencyService". Click OK to generate the proxies.


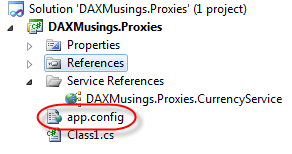
Besides the proxy classes being generated by Visual Studio, it also puts all the web service bindings and information in the app.config file of your project. You can open it by double clicking on the app.config in the Solution Explorer.


Now, when an application loads a config file, it looks for the application's executable name and .config at the end. So on the AX client the Ax32.exe.config gets loaded. On the server side, Ax32Serv.exe.config file. Of course, our code is in the app.config, which is not helpful, it will never be loaded.
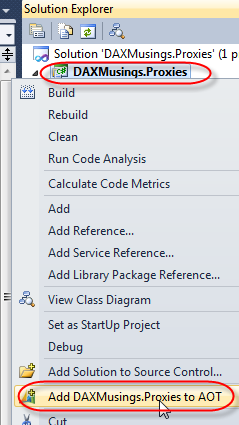
Let's see what happens. On the project, right-click and select "Add DAXMusings.Proxies to AOT".


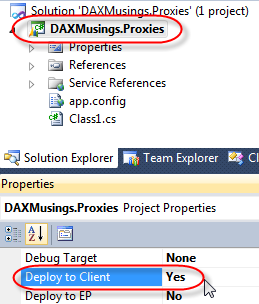
Next, in the properties of the project, set the "Deploy to Client" property to "Yes".


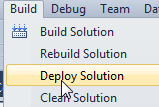
Save the project and click Build / Deploy Solution. This will build and deploy your solution to the AX client.


Next, let's open the AX client. If you still had the client open, close it first and re-open. To do a quick and dirty test on the client, let's create a new job. If not open yet, open a developer workspace using CTRL+SHIFT+W. In the AOT, right-click and select New > Job.


In the code, we'll just create an instance of the service client, and call the service:

static void Job7(Args _args)
{
    DAXMusings.Proxies.CurrencyService.CurrencyServiceClient  service;
    DAXMusings.Proxies.CurrencyService.Currency currency;
    System.Exception ex;

    try
    {
        service = new DAXMusings.Proxies.CurrencyService.CurrencyServiceClient();
        currency = service.GetConversionRate(
            DAXMusings.Proxies.CurrencyService.CurrencyCode::USD,
            DAXMusings.Proxies.CurrencyService.CurrencyCode::EUR);
    
        info(strFmt('%1', CLRInterop::getAnyTypeForObject(currency.get_Rate())));
    }
    catch(Exception::CLRError)
    {
        ex = CLRInterop::getLastException();   
        info(CLRInterop::getAnyTypeForObject(ex.ToString()));
    }
}

Now, if you try to run this service, you get the error "Object 'CLRObject' could not be created". Not very helpful, and trying to catch a CLR Exception won't work either. If you look in the Windows Event Viewer, all you'll find is a warning that Dynamics AX is unable to load your assembly's config file. I'm unsure how to actually get the exception details in AX, so if anyone knows let me know. What I've done to get this, is basically create a static method in Visual Studio that I can debug. The error message I got out of that is:
Could not find default endpoint element that references contract 'CurrencyService.ICurrencyService' in the ServiceModel client configuration section. This might be because no configuration file was found for your application, or because no endpoint element matching this contract could be found in the client element.
So yes, the is the actual issue at play. The endpoint is in the app.config (in the output it becomes DAXMusings.Proxies.dll.config, check your user folder under AppData\Local\Microsoft\Dynamics AX\VSAssemblies where assemblies are deployed... check my blog post on Assembly deployment) and not in the config file of the executing host for our class library (AX32.exe.config).
And that is exactly what AIFUtil fixes! Change the code to the following:


static void Job7(Args _args)
{
    DAXMusings.Proxies.CurrencyService.CurrencyServiceClient  service;
    DAXMusings.Proxies.CurrencyService.Currency currency;
    System.Exception ex;
    System.Type type;

    try
    {
        type = CLRInterop::getType('DAXMusings.Proxies.CurrencyService.CurrencyServiceClient');
        service = AifUtil::createServiceClient(type);
        //service = new DAXMusings.Proxies.CurrencyService.CurrencyServiceClient();
        currency = service.GetConversionRate(
            DAXMusings.Proxies.CurrencyService.CurrencyCode::USD,
            DAXMusings.Proxies.CurrencyService.CurrencyCode::EUR);

        info(strFmt('%1', CLRInterop::getAnyTypeForObject(currency.get_Rate())));
    }
    catch(Exception::CLRError)
    {
        ex = CLRInterop::getLastException();
        info(CLRInterop::getAnyTypeForObject(ex.ToString()));
    }
}

And yes, that one works! If you look into the createServiceClient() method, you'll notice it actually loads the class library's config file. Nice! Problem solved!!

So, as a final note, on Twitter the question was asked, how do I differentiate between development and production? First I didn't get the question, but I get it now. If you are calling a custom service you've made, you may have a version of the service for development, and a separate version for production. Of course, the class library points to one and only one URL. So how do we make it point to different places in different environments without changing the code between the environments?

Change the config file? This would work, but the class library's config file is stored in the model store and downloaded by the client/server. It can't be changed unless it's changed in the AOT, the Visual Studio project is rebuilt, at which point the client/server will download the new version from the model store. So, you could copy/paste all the app.config settings into the AX32(serv).exe.config file and change it there. Then you won't need to use the aifUtil::createserviceclient. In any case, this is very impractical, especially for services running on the client side!

We can just go the AX route, and store the URL in a parameter table somewhere. Then, at runtime, we change the end point address with the following code (replace the hardcoded the localhost url with a parameter).


static void Job7(Args _args)
{
    DAXMusings.Proxies.CurrencyService.CurrencyServiceClient  service;
    DAXMusings.Proxies.CurrencyService.Currency currency;
    System.ServiceModel.Description.ServiceEndpoint endPoint;
    System.Exception ex;
    System.Type type;

    try
    {
        type = CLRInterop::getType('DAXMusings.Proxies.CurrencyService.CurrencyServiceClient');
        service = AifUtil::createServiceClient(type);
        //service = new DAXMusings.Proxies.CurrencyService.CurrencyServiceClient();
        endPoint = service.get_Endpoint();
        endPoint.set_Address(new System.ServiceModel.EndpointAddress("http://localhost/HelloWorld"));
        
        currency = service.GetConversionRate(
            DAXMusings.Proxies.CurrencyService.CurrencyCode::USD,
            DAXMusings.Proxies.CurrencyService.CurrencyCode::EUR);

        info(strFmt('%1', CLRInterop::getAnyTypeForObject(currency.get_Rate())));
    }
    catch(Exception::CLRError)
    {
        ex = CLRInterop::getLastException();
        info(CLRInterop::getAnyTypeForObject(ex.ToString()));
    }
}


Tuesday 12 March 2013


Personalization of Role Centers in Dynamics AX 2009


In this post, we will cover easy-to-do modifications that can be done to Role Center pages and do not require special development skills. The goal is to explain how to add a value to a Role Center page by changing to best suit your business needs.
There are a number of predefined Role Centers for different roles that are coming with Dynamics AX and all of them can be personalized to be more useful to you. We assume you already have Dynamics AX 2009 installed and Role Centers configured. For the example, we will use the default Role Center that is a home page for users that are not associated with a specific role. The default page looks like this:

picture1

As you can see, there is a lot of unused space on the default Role Center page. Let’s try to make this page more useful by modifying the Web Parts that are already present on the page and by adding some additional Web Parts.
We already have 3 Web Parts on the page:
· Cues
· Quick Links
· Work list.


However, by default only the Work list has some predefined data, the Cues and the Quick Links Web Parts are just empty containers that should be modified to be useful.

Adding a link to the Quick Links Web Part
First, let’s add some links to the Quick Links. All you need to do is to click on Add Links (pretty straightforward, isn’t?) and a dialog will pop up where you can chose which link you want to add. The dialog looks like this:

picture2


Here we have 3 options - we can add a link to:
- Any item from the main menu (Desktop link)
- Any Enterprise Portal page (Enterprise Portal link)
- Any hyperlink (URL)
We will add one of each type:

picture3

picture4

picture5


By default, the EP link is hidden in the desktop client, but shown on the Role Center page on the Enterprise Portal. Click Display Enterprise Portal links in the client to choose to have the EP link in both the desktop client and on the EP page. Desktop Links are shown only in the client and hidden in EP, while URL links are shown in both places.
Now we can see the following links in the Web Part in the client:

picture6

Let’s look how the Web Part looks on the EP page:
picture7


The Desktop Link in the example will lead to the Inventory Management/Items list page; the EP Link will open the Sales/Activities page.
We can manage all our links from both the EP and the client. Click Manage Links to open a dialog where we can change the order of the links, remove links or edit them:
picture8

We have changed the order or the links by putting the URL link on top and also changed the title of the EP link to make it clear that it points to the Sales Activities page:

picture9

It does not matter whether you do modifications on the EP page or in the client – the changes are reflected in both places, you just need to press F5 to refresh the page in the client if you have done modifications on the EP page and vice-versa.
In the top right corner of the Web Part, you can see the drop down menu that allows switching between Personal and Shared views of the links. This control is visible for Dynamics AX administrator users only; other users can only see the Personal view. By switching to the Shared view, an administrator user can add or manage links that are available by default to all users in the personal links view mode. Individual users (including administrators) might choose to delete the shared link from their Personal view, it will not affect other users. If an individual user modifies the shared link, then the modified version becomes a personal link for this user and the shared version is excluded from the user’s Personal view while other users are not affected by the changes. If the administrator user modifies the shared link using the Shared view, then the changes are reflected on the Personal views of all users.
We hope now you know how to personalize the Quick Links Web Part to best fit your needs.

Creating a new cue and adding it to the Cues Web Part

Let’s now see how we can add value to the Cues Web Part that is empty so far. The Cues Web part can show a pictorial representation of an important number for a business, for example, the number of open sales orders. There are a number of predefined Cues that you can easily add to the Web part on your page by clicking the small button on the right side of the Web part and selecting the Modify Shared Web Part menu item.

picture10

By doing this, you are entering edit mode for the role page. The Web Part property editor for the Cues Web part will appear in the left side of the page. There we can select Cue to modify (the Cues Web part can show up to 6 different Cues) and choose one of the existent Cues. We have chosen the Delayed Receipts Cue.

picture11

After choosing a Cue the default values for the Cue’s parameters will be copied from the Cue definition. For now, let’s just use the default values and press the OK button at the bottom to apply changes.

We have added several more predefined Cues:

picture12


Pretty cool and quite easy, isn’t?
Now let’s create our own new Cue, that could be more interesting. To do it, we need to open a form with the list of artifacts we want to present as a Cue and then press Ctrl-F3 to open the SysQuery form. We will use the Inventory On Hand List page.

picture13

Let’s say we would like to see in the Cue the number of items with 0 physical inventory quantities. To do it, we are adding a new range to the query with criteria 0 for the Physical inventory field of the On-hand inventory table.

picture14

Then, we press the Modify button at the top-right and select the Save as Cue… menu item. It opens the Save as Cue dialog where we can specify parameters for our newly created Cue.
The Save as Cue dialog is available only when the form has been added to the main navigation in Microsoft Dynamics AX. To do this, you must create a menu item for the form, and then add the menu item to a menu that can be accessed through the MainMenu form in Microsoft Dynamics AX.

picture15

We have set a Cue Id and caption values for our Cue; we also have changed the Count Max property to 20. The Count Min and Max properties define how the Cue is rendered, depending on the number of artifacts it represents. If the number of artifacts is less than the Count Min value the Cue is rendered as an empty stack of documents. If the number of artifacts is more than the Count Max value, the Cue is rendered as a maximum stack of document and does not grow anymore even if the number of artifacts grows. We have also set the Threshold expression and value so that if we have 5 or more artifacts in our Cue, a warning sign will be rendered over the Cue’s icon. We also marked the Cue to be available to everyone.

Now let’s go back to the Role Center page and see what we will get when we add our newly created Cue to the Cues Web part. To do this, we enter the page Edit Mode again, select Cue 6 to modify, to put our new Cue to the last position and then select Items with zero physical inventory from the View drop down, then click OK to apply the changes. Now we can see our new Cue:

picture16

When we created our Cue, the Total property was disabled. This is because we should have a field of type Amount or AmountMST to set an aggregate function for the Cue that displays the total. Let’s see how it works on the Delayed Receipts cue (there are fields of mentioned types on it). So, we enter the page edit mode again and select the Delayed Receipts cue (Cue 1 in the example). Now the Total property is enabled and we can set the aggregation function to be Sum(PurchLine:PurchPrice).


picture17
After applying the changes, we will see the total amount of the purchase price of all delayed receipts that are represented on the Cue:
picture18
Isn’t it an easy and powerful way to get a pictorial representation of important business numbers? We hope now you know how to personalize Cues Web parts to make them really useful.
Adding other Web Parts to the role page
We still have a lot of free space on our role page, so let’s add more Web parts. To do it, we click on Personalize this page at the top-right corner of the page and enter the page edit mode that we are familiar with.
picture19
To add a new Web part, we just click one of the Add Web Part links depending on where on the page we want to have additional Web Part. Let’s say we want to add the Dynamics Report Server Report Web part above the Work List Web part, so we click on the yellow bar with the Add Web Part link just above the Work List Web Part. Actually, any Web Part on the page can be easy dragged to another place.
After clicking on Add Web Part the following dialog appears with the list of different Web Part types that could be added to the page. There is a really wide spectrum of different Web Part types to choose from, so you have lots of options. We will use the Dynamics Report Server Report Web part in the example.
picture20
After adding the Dynamics Report Server Report Web Part to the page, we need to specify which report we want to host in this Web Part. We select the Modify My Web Part item from Edit menu in the top-right corner of the Web Part to open the Web Part properties dialog and select the desired report from the list of available reports in the Report name drop down menu. We select the Top delayed production orders report.
picture21
We also choose to not show the report parameters toolbar and then apply the changes:
picture22
We can change the report’s parameters by pressing the Get Parameters button in the Web Part properties dialog. We want to see only 4 orders in the report, so we uncheck the Default checkbox for Number of orders parameters and set the value for the parameter as 4.
picture23
Then we press the OK button to apply the changes. Now we only see the top 4 delayed production orders in the report.
picture24
In the same way, we added several more reports and the Announcements Web Part. Now the role center page looks like this:
picture25
We hope that now you can personalize your Role Center pages in the way that perfectly fits your business needs, allowing you to more efficiently do your everyday work and having all essential information on your Dynamics AX role home page.


Monday 11 March 2013

DCRM integration with DAX


Connecting Microsoft Dynamics AX 2012 with Microsoft Dynamics CRM

With the general availability for MS Dynamics AX2012 in August, we’ve also released an update of the Connector for MS Dynamics AX2012 and MS Dynamics CRM. Connector for Microsoft Dynamics helps customers who are using Dynamics CRM (either online or on-premise) integrate it with their Dynamics ERP solution. Out of the box, we provide you with baseline integrations that will help you move customer information, inventory and pricing information and sales order between the two systems. Using a web service to web service integration on a scheduled basis, the data moves seamlessly between the two solutions, helping you keep the two systems in sync. Plus, it's easy to modify the baseline integrations to better match how you do business. You can easily synchronize additional fields, adjust the length of time between schedules, or do deeper modifications using the Connector SDK.

Robust integration that ‘just works’

To date, over 300 Microsoft Dynamics ERP/CRM customers have deployed the Connector for Microsoft Dynamics to enhance their business process integration. With the Connector, our objective is to provide our customers a robust integration that ‘just works’ and minimizes the infrastructure ‘overhead’ required to run. The connector for Microsoft Dynamics has been developed from the ground up in (.NET) managed code, and it not dependent on any other transformation technology (such as XSLT, BizTalk) .
Connector has a very small foot print and is a very small download (approx. 5MB). It does create a small SQL database that maintains the state of the integrations as well as the currently running maps. Once Connector is installed and the initial data sync occurs, most users find their only interaction with the system occurs when a record fails to integrate and they need to contact the record’s owner.

Customization capabilities

As mentioned above, the SDK allows you to customize the integration to meet specific requirements. There are several mechanisms built into Connector for Microsoft Dynamics, which allow you to customize your integration, for example:
  • clip_image001Map templates, including using functions to transform data
    • Fields not mapped by default in MS Dynamics CRM or MS Dynamics AX
    • User-defined fields in MS Dynamics CRM or MS Dynamics AX
    • Using constant values or manipulating the data as it is transformed
  • Schedules
    • Run some maps less often than default settings for maximum efficiency
    • Run maps more often than default to support “real-time” business
  • Notifications -
    • Let you know when an exception occurs - Immediately, daily, or weekly
  • Log file
    • Will retry integration, in situation where error is timing related
    • Other errors may require your intervention
  • Import/Export maps
    • Transfer customized maps to another Dynamics AX company
And finally, if you need to expose customizations to existing entities or if you need to expose entirely new entities for integration, you can follow this process for Microsoft Dynamics AX 2012 and Microsoft Dynamics CRM.

Technical requirements

Some of the key capabilities and system requirement of the connector:
  • Transaction Management: Connector for Microsoft Dynamics provides both exception logging and the ability to retry failed transactions. Administrators with proper security permissions may access log files describing errors and possible resolution steps. Connector also provides a notification mechanism for contacting the appropriate party in case an integration or system failure has occurred.
  • Transactional transformation: Connector provides the ability to add logical processing to in-stream transactions. This normally takes the same form as a standard Excel function would.
  • Language Support: The Connector User Interface (UI) is International English only, but multi-language data integration between Microsoft Dynamics CRM and Microsoft Dynamics ERPs is possible when both are using a common base language.
  • Multi-Currency: The Connector utilizes the multi-currency features of Dynamics AX and CRM.
  • Communication Protocol: The Connector is built upon standardized web service integration that also allows for configurable data transformation in stream.
  • Version Support: The current version of the Connector supports both on premise and on-line version of Microsoft Dynamics CRM 4.0 and 2011 with transactional connections to Microsoft Dynamics AX 2009 SP1 and AX 2012, Microsoft Dynamics GP 10 & 2010, and Microsoft Dynamics NAV 2009 R2.
  • System Requirements: Hardware and software requirements for Connector mirror the requirements for Microsoft Dynamics CRM and Microsoft Dynamics ERPs. This includes: Windows Server 2003 SP2 or 2008 and SQL Server 2005 or 2008 as well as .NET 4.0. Microsoft Dynamics CRM and a Microsoft Dynamics ERP are also required and the integrated companies must use the same base currencies and cultures.