
Document management in AX 2012

In Dynamics Ax 2012, you can attach documents to specific records. This can be done by clicking the “Attachments” button on the Ribbon for many forms. Below is a screen capture for Workers form:

The picture isn’t clear, this is just to give an idea where you should possibly look for Attaments button.
But before you go ahead with Document attachments, you need to setup few things listed below:
- Activate Document management
- Set up Archive Directory – place to store the documents
- Create required Document types
- Use Document management to attach files to records in any Dynamics Ax Form.
Activate Document Management:
Complete the following procedure to activate document management.
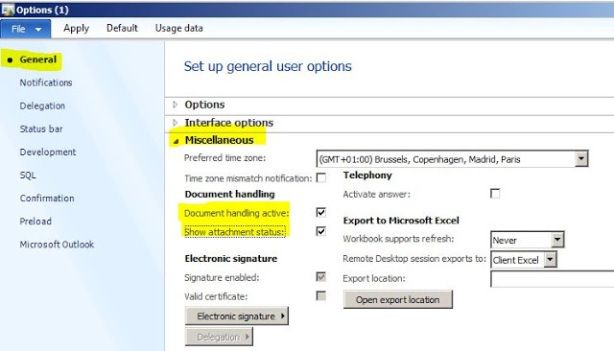
- Click File > Tools > Options.
- Click General and then expand the Miscellaneous FastTab.
- Select the Document handling active check box.
- Select Show attachment status to highlight the Document handling control on the status bar
and Select Action Pane when you select a record that has documents references.

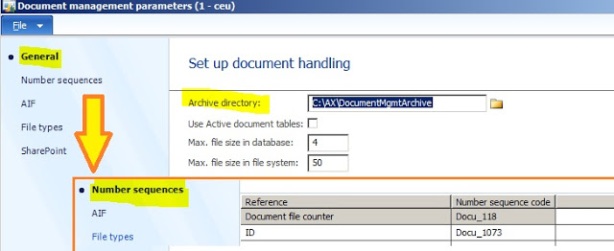
Set up document Archive Directory:
Complete the following procedure to set default document archive directory.
- Click Organization administration > Setup > Document management > Document management parameters.
- In the General area of the form, in the Archive directory field, enter the path to the archive directory.
- Click Number sequences, and select the ID reference.
- In the Number sequence code field, select the number sequence code to use for naming your documents.

Note: You can select an alternative archive directory for each document type in theDocument types form. If you change the archive for your documents, existing document references will not work unless you have already copied all existing documents to the new archive.
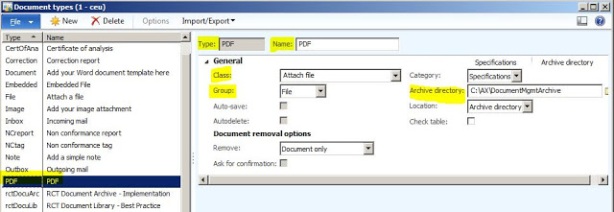
Create required Document types:
The document can be attached if and only if the file is of any type that is set up in the Document types form.
The document can be attached if and only if the file is of any type that is set up in the Document types form.
Follow the below steps to create a new document type:
- Click Organization administration > Setup > Document management > Document types.
- Press CTRL+N to create a new document type.
or you can click the “New” button. - In the Type field, enter a code for the document type.
This Type field is shown while adding documents to records, so recommended to have a descriptive name here. - In the Name field, type a descriptive name for the document type.
More description if needed. - In the Class field, select the type of document to create.
To specify which class do you want the new document type to fall in. - In the Group field, select a group for the document type.
Choose among the pre-defined groups avaliable. - Close the form to save your changes.

Using Document management:
You can actually perform any of the below actions:
- Create a new document
- Create a Copy of an existing document
- Copy to clipboard to copy the document elsewhere in the System
Below are examples of how to do it, and are performed on Prospect details form (Sales and marketing module)
Create a document
- Click Sales and marketing > Common > Prospects > All prospects.
- Select the prospect record that you want to create an attachment for or attach a document to.
- Click Attachments to open the form.
- Press CTRL+N to create a new document.
- Select the document type in the Documents form and then click OK.
Note: The document icon in the Prospects form changes from an empty sheet of paper to a book. This indicates that there are documents attached to the prospect record.
You can create documents for other users by selecting their user names from the list in the Author field. You can also transfer a document to another author in the Author field.
Copy a document
- Click Sales and marketing > Common > Prospects > All prospects.
- In the Prospects form, select the prospect record from which you want to copy a document.
- Click Attachments to open the Documents form.
Verify that the document attached is a type that can be opened, such as a Microsoft Word file type or a Microsoft Excel worksheet.
- Click Copy.
- In the Description field, update the description of the newly copied document.
Copy a document to the Clipboard
- Click Sales and marketing > Common > Prospects > All prospects.
- In the Prospects form, select the prospect record that has the document that you want to copy to the clip board.
- Click Attachments to open the Documents form.
- Click Copy to clipboard.
The active document is now copied to the Clipboard and can be pasted into any file that accepts text (such as email or a document).
- Press CTRL+V to paste the copied document into the destination.
Note: The copy-and-paste procedure creates a copy of the selected document in the file system but does not maintain any connection to the document management system of Microsoft Dynamics AX. No new document identification is created, nor is the copied document attached to any record.
Information collected from: http://technet.microsoft.com/en-us/library/aa549988.aspx
All of these tips are great, that’s very interesting. I’m so tempted to try that myself, but you would think if it were effective, more people would do it.
ReplyDeleteDocument Management Software India
Document Management Software Chennai
Document Management Software
Electronic Document Management System